How & Why to use the "key" attribute in VueJS v-for loops

When developing in VueJS, you might have realized that you should use the :key attribute in the v-for loops. You also might have ended up with a linter like ESLint screaming at you, stating you should always use the :key attribute with v-for.
So you thought, well why not just use the index of the looped array. Great, the linter stopped complaining.
But using :key like that is just dead wrong.
In this article, I’ll explain why and how you should use the VueJS :key attribute in v-for loops.
Check the video I made on this topic:
Or just keep reading to learn more.
How VueJS renders data in HTML templates
Let’s see how, conceptually speaking, VueJS renders changes in data.
Say you have the following in your template:
<h1>{{ blogPostTitle }}</h1>
Now imagine that the value of the variable blogPostTitle changes to another value. By default, VueJS is going to optimize this operation by patching the <h1> element, meaning that it’s going to modify the value (content) of the element that’s already there.
‘key’ special attribute in VueJS
In simple cases like this, patching the element in-place like described above is exactly what we want, but for certain other cases we want to give an extra “hint” to the VueJS virtual DOM algorithm to avoid patching, and instead recreate the whole DOM element, i.e. delete and create.
So, for that purpose, we use the :key attribute. If we do the following:
<h1 :key="blogPostTitle">{{ blogPostTitle }}</h1>
This tells the algorithm that whenever the key for the <h1> changes (which is set to blogPostTitle), it should completely recreate the whole element. In this example, it’s each time the value of the variable blogPostTitle itself changes.
For simple cases like this, it doesn’t make sense to use :key. But, there are more complex cases where if you don’t use the :key, you’re going to run into bugs.
For example, adding the :key when using v-for loops inside templates is very important, especially if we’re looping over Vue components that have initialization logic.
What can happen if we don’t use ‘:key’ in v-for ?
To prove this point, let’s start with an example. We have an app that renders a list of to-do items.
<div id="app">
  <todo-item v-for="todo in todos" :item="todo">
  </todo-item>

  <button @click="addTodo">
    Add new item
  </button>
</div>
The Vue app is defined like this:
new Vue({
  el: "#app",
  methods: {
  	addTodo() {
    	this.todos.unshift(
      	  { id: 2000, text: 'Write article' },
      );
    },
  },
  data() {
	return {
      todos: [
        { id: 1000, text: "Decide on article topic" },
        { id: 1001, text: "Prepare code example" },
        { id: 1002, text: "Prepare article outline" },
      ],
	};
  },
})
We have a predefined list of todos and a method addTodo() which adds a new to-do item to the beginning of the todos array. For simplicity, I hard-coded the new item { id: 2000, text: 'Write article' }, but it could be added via button and a text input field. As you can see from the app template above, the addTodo() gets called when we click the button Add new item.
To render a list of to-do items themselves, we use a Vue component todo-item defined like this:
Vue.component('todo-item', {
  props: {
  	item: {
      type: Object,
      required: true,
    },
  },
  data() {
  	return {
        isDone: false,
  	};
  },
  template: `
  	<div>
      <input type="checkbox" :id="item.id" v-model="isDone">
      <label :for="item.id">{{ item.text }}</label>
    </div>
  `
})
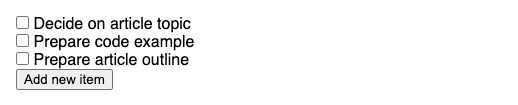
Notice we initialize the component’s local isDone variable to false since we want to make every newly added to-do item to be “not done”. Once we first open the app in the browser, we see the following:
Now let’s say we tick all of the items “done”:
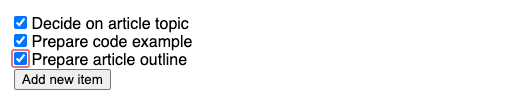
This changes each of the component’s isDone variable to true.
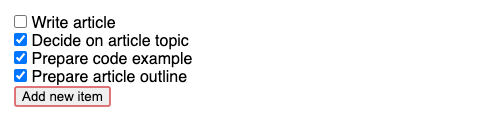
Now we click the “Add new item” button to add a new “Write article” to-do to the top, and we might be surprised to find this:

So what happened here ?!? We were expecting that the old items remained ticked as “done” and the new one initialized to “not done”.
The issue lies in the fact that VueJS is optimizing changes to the DOM and reusing the existing elements (patching them) as much as possible. The new item was added to the top in the same position as the item “Decide on article topic” was placed before the new item was added. So instead of a new element being created, the existing one was patched with the new “Write article” item.
Because the old DOM element was reused and the new one was not created, the component was not initialized with isDone: false and the existing value of isDone which is set to true is used. If we had any logic in the Vue hooks like created() or mounted(), those would not run either.
On the other hand, the “Prepare article outline” item was “pushed” off the bottom and ended up in a new position that didn’t exist before in the DOM. So the element (component) was re-created and isDone was initialized to false.
Again, this was not our intention.
Solution: use the :key
These kind of bugs are very difficult to debug. That’s why we should always use the :key attribute with v-for:
<div id="app">
  <todo-item v-for="todo in todos" :item="todo" :key="todo.id">
  </todo-item>

  <button @click="addTodo">
    Add new item
  </button>
</div>
As you can see, we used the id of each to-do item as the key. This way, since the id is unique for each to-do item, we are effectively “showing” the algorithm which items were there before the change, and which one was added.
Since the new to-do item has an id=2000, Vue knows that it’s a new item that didn’t exist before so it creates a new component to hold it and its isDone is initialized to false. For this simple example with hard-coded value { id: 2000, text: 'Write article' }, the button should be clicked only once, otherwise there would be more items with the same id, and that is not allowed either.
As for the rest of the existing to-do items, since they have the keys with the same id values as before we clicked the button, Vue knows it should keep the existing components and place them in new positions. That’s why their isDone values remain unchanged.
Now we get the result we originally expected:
Common misconception
Developers often get tripped up on thinking that since the :key is strongly recommended (even required by some ESLint rules) in the v-for loops, that they can just use the index of the loop as :key.
l know! I was there 😊
Sure, it’s going to get rid of the ESLint warning, but the problem with that approach is that it’s exactly the same as not providing a :key attribute, because the uniqueness of items cannot be based on loop indices since those can be reused for new values.
That’s why it’s important to use a unique value like id for the :key.
Conclusion
Alright, folks, I hope this was clear enough, feel free to ask any questions in the comments and maybe we can all learn something we didn’t know yet 😉.